Fix Installation Error 0xC1900101 in Windows 11
In this article, we’ll go over how to fix the 0xc1900101 Windows 11 installation error.
1 Fix Installation Error 0xC1900101 in Windows 111.1 Unplug Additional Hardware1.2 Disable Third-Party Antivirus1.3 Update Your Driver1.4 Ensure Your PC Has Enough Storage1.5 Perform SFC And DISM Scan1.6 Update Your BIOS1.7 Upgrade To Windows 11 Using ISO File2 Final Words
Unplug Additional Hardware
Many times additional hardware connected to your PC may also be the reason behind you facing the Windows 11 installation error 0xc1900101. You should try unplugging all the additional hardware like USB drives, speakers, and such. Try unplugging all the additional hardware from your PC, and then update the Windows 11. This should fix the issue, and you should be able to update to Windows 11 without any issue. However, if you still face the issue then you should try the next troubleshooting step in this article.
Disable Third-Party Antivirus
If you have third-party antivirus software installed on your PC, then it may also be the reason behind you facing the issue. You should try disabling the third-party antivirus software on your PC, to fix the issue. After doing so, the issue should be fixed. If disabling the antivirus didn’t work, then try uninstalling the software. Try updating to Windows 11 now, and you should be able to do it without any problem.
Update Your Driver
Another thing that you can do is update your driver. You can do so by downloading the driver package from the official website of the hardware you use. If you have a laptop then you can head to the official website of your laptop and then download the driver package from there. You can either update the driver using third-party software like Driver Booster or DriverPack Solution. This software lets you easily update the drivers on your PC without any issue.
Ensure Your PC Has Enough Storage
If your PC doesn’t have enough storage, then also you may face the same issue. You should ensure that your PC has enough storage to install Windows 11. You will need at least 64GB of storage to install Windows 11 on your PC. Ensure you have at least 64GB of storage left on a single partition if you want to install Windows 11.
Perform SFC And DISM Scan
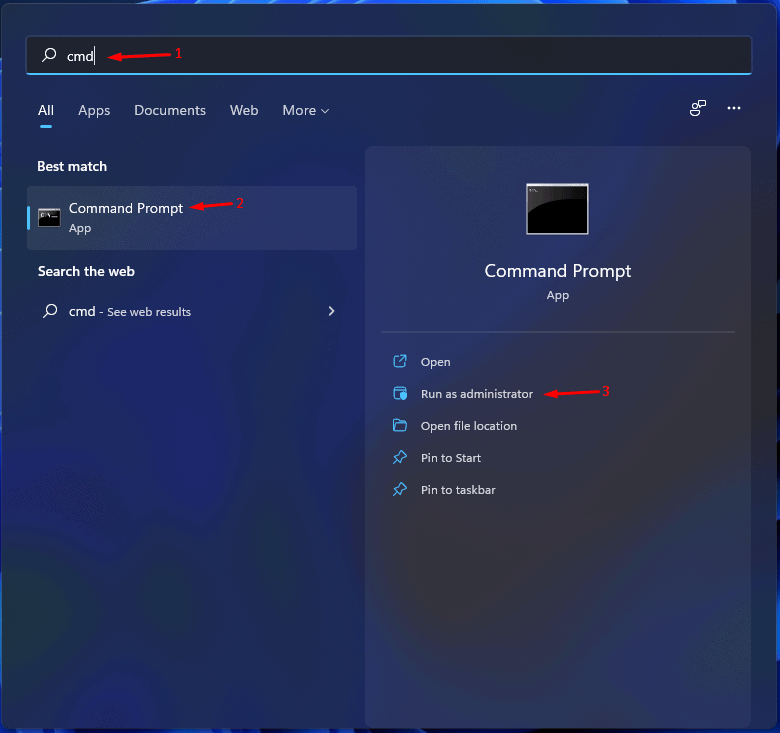
If you still face the issue, then you should try performing an SFC scan. SFC means System File Checker. It scans your PC for issues due to corrupted files or cached data and fixes them. To perform an SFC scan, follow the steps given below-
Open the Start Menu by pressing the Windows key.In the Start Menu, search for Command Prompt. Right-click on Command Prompt in the Start Menu, and then click on Run as administrator.
In the Command Prompt, type SFC /scannow and hit Enter to execute it.
Wait for the process to complete and then close the Command Prompt and restart your PC. This should probably fix the issue for you.
If performing the SFC scan doesn’t help you, then you should try performing the DISM (Deployment Image Servicing and Management) scan. To perform the DISM scan follow the steps given below-
Run the Command Prompt as administrator. You can do so by following the steps given above. In the Command Prompt, type and execute the following command- Dism /Online /Cleanup-Image /RestoreHealth
Wait for the process to complete, and the issue should be fixed by now.
Update Your BIOS
You may face this issue due to outdated BIOS. To fix the issue, you will have to update your BIOS. The process to update BIOS can be different for different motherboards. You will have to check your motherboard’s guide to update your driver. You can either search the internet for the steps to update your BIOS for your motherboard.
Upgrade To Windows 11 Using ISO File
If none of it helps you, then probably you should try upgrading to Windows 11 using the ISO file. We have a guide on it that will help you with making a bootable USB drive for Windows 11 using the ISO and upgrading to Windows 11 using it. RELATED GUIDES:
How To Fix High CPU Usage In Windows 11How To Rotate The Screen on Windows 11Fix Ethernet Doesn’t Have a Valid IP Configuration Error in Windows 11
Final Words
This is how you can fix Windows 11 installation error 0xc1900101 that you may face while upgrading to Windows 11. Following the above steps, you will be able to fix the issue that you are facing.
Δ


